Stick Welding Amperage Chart: How to Set the Right Amps for Welding Rod Sizes
Learn how to set the correct amperage for stick welding with this simple welding amperage chart. This guide explains amp settings for common welding rod sizes like 6010, 6011, 6013, and 7018 to help beginners achieve stronger, cleaner welds.
WELDING
4/2/20263 min read
Disclosure: This post may contain affiliate links. As an Amazon Associate we earn from qualifying purchases.
One of the most important settings in stick welding is amperage. If the amperage is too low, the rod will stick and the weld won’t penetrate properly. If it’s too high, the weld can become messy, produce excessive spatter, or even burn through the metal.
Understanding how to set the correct amperage for different rod sizes is one of the fastest ways to improve your welding results.
In this guide, we’ll break down a simple stick welding amperage chart, explain how amperage affects weld quality, and share tips to help beginners dial in their welding machine for better results.
What Does Amperage Do in Welding?
In stick welding (SMAW), amperage controls how much heat the electrode produces.
More amperage means:
• deeper penetration
• a hotter weld puddle
• faster melting of the rod
Less amperage means:
• cooler weld puddle
• less penetration
• slower rod burn rate
Getting the right balance is key to creating strong, clean welds.
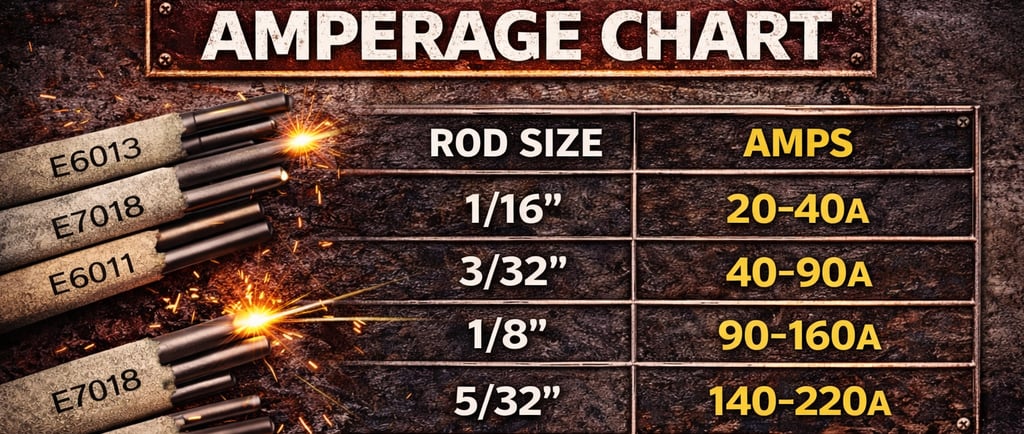
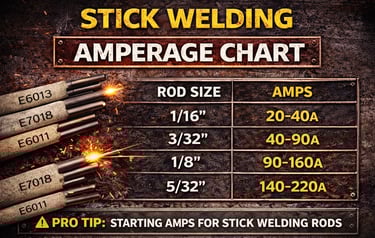
Stick Welding Amperage Chart
The correct amperage depends primarily on the diameter of the welding rod.
Here’s a general amperage guide for common rod sizes.
1/16” Rod
20 – 40 amps
This rod size is used for very thin metal and light repair work.
Common uses:
• sheet metal
• small brackets
• thin steel projects
Because this rod is small, it requires lower amperage to prevent burn-through.
3/32” Rod
40 – 90 amps
The 3/32 rod is one of the most popular sizes for beginners.
Common uses:
• light fabrication
• automotive work
• general repairs
This rod offers a good balance of penetration and control.
1/8” Rod
90 – 160 amps
The 1/8” electrode is one of the most widely used rod sizes in stick welding.
Common uses:
• structural welding
• farm equipment repair
• fabrication projects
This rod size provides stronger penetration and is suitable for thicker materials.
5/32” Rod
140 – 220 amps
This rod size is typically used for heavier welding applications.
Common uses:
• thick steel
• heavy equipment repair
• structural welds
Because it produces a larger weld puddle, it requires higher amperage.
Why Amperage Settings Vary
While charts provide a good starting point, the ideal amperage can vary depending on several factors.
Type of Welding Rod
Different electrodes behave differently.
For example:
• 6010 rods run hotter and require more amperage
• 6011 rods work well on dirty or rusty metal
• 6013 rods are easier to control for beginners
• 7018 rods are used for structural welding
Each rod type has its own recommended amperage range.
Welding Position
Welding position can also affect your settings.
For example:
• Flat welding can handle higher amperage
• Vertical welding often requires lower amperage
• Overhead welding requires tighter heat control
Lower amperage helps prevent the weld puddle from becoming too fluid when welding out of position.
Metal Thickness
Thicker metal requires more heat to achieve proper penetration.
Thin metal requires lower amperage to prevent burn-through.
As a general rule:
• thin steel → lower amperage
• thick steel → higher amperage
Signs Your Amperage Is Too Low
When amperage is too low, you may notice:
• electrode sticking to the metal
• poor arc stability
• weak penetration
• uneven weld bead
The weld may look tall and narrow, and slag removal may be difficult.
Increasing amperage slightly can often solve these issues.
Signs Your Amperage Is Too High
Too much amperage can also cause problems.
Signs include:
• excessive spatter
• undercut along the weld edges
• burn-through on thin metal
• very wide weld bead
When this happens, lowering the amperage slightly usually improves the weld quality.
Pro Tip: Start Low and Adjust Up
A simple trick many welders use is to start at the lower end of the recommended amperage range.
Then slowly increase the amperage until the arc becomes smooth and stable.
This helps you find the sweet spot for your machine, rod type, and material thickness.
Every welder and machine behaves a little differently, so small adjustments make a big difference.
Choosing the Right Welder for Beginners
If you’re just getting started with welding, choosing the right welding machine can make learning much easier.
A good beginner welder should be:
• easy to adjust
• capable of running common rod sizes
• reliable and portable
• affordable
Many beginners today start with a compact multi-process welder that can handle flux-core MIG, stick welding, and even TIG welding.
These machines offer flexibility for different types of projects.
Our Favorite Entry-Level Welder
If you’re looking for a great beginner welding machine, we recommend checking out one of the most popular entry-level welders currently available.
It’s affordable, beginner-friendly, and versatile enough to handle MIG, stick, and basic TIG welding projects. For garage welders, DIY fabricators, and home repair work, it’s a solid machine to start learning with.
Final Thoughts
Learning how to set the correct amperage is one of the most important skills in stick welding. Using a simple amperage chart as a starting point can dramatically improve your weld quality and help you avoid common beginner mistakes.
As you gain experience, you’ll learn to adjust your settings based on rod type, metal thickness, and welding position.
Stick welding takes practice, but once you understand how amperage affects your welds, dialing in your machine becomes much easier.
Help
Questions? Reach out anytime, we’re here.
Contact
© 2026. All rights reserved.